🕑 Reading time: 1 minute
Hardness of a material is defined as its resistance to indentation. Rockwell hardness test measures the permanent depth of indentation on a metal by applying a fixed load using an indenter. The smaller the indentation value, the harder is the material.
The Rockwell hardness scale is designed to determine the hardness of materials like aluminum, thin steel, lead, iron, titanium, copper alloys, and cemented carbides.
This article explains the procedure to perform the Rockwell hardness test on metals.
Rockwell Hardness Test Procedure
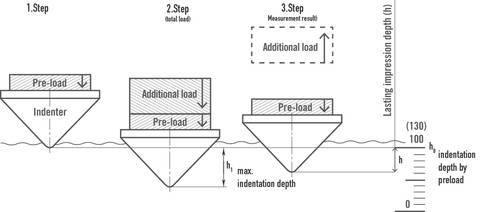
The Rockwell hardness test employs the principle of differential-depth method. During the test, the indenter of the equipment is forced to make a residual depth on the test specimen. This is called as an indent and its depth is measured. The total test force is applied in two stages to eliminate errors caused due to the roughness of the surface and measurement.

Step 1: The indenter is pressed into the specimen to a penetration depth of ho. The indentation is made by using an indenter pressed at a test pre-force or preload. The ho is a reference depth that is used for measuring the residual indentation depth (h).
The indenter used can either be a diamond or a steel ball indenter. During the preliminary test, the pre-load force is held for a specified dwell time to create a baseline depth of indentation (ho). The applied preload breaks through the surface by reducing the effects of surface finish.

Image Courtesy: emco.test
Step 2: In this step, an additional load is applied over the preload. Here, the test includes the application of the total load on the indenter. This major force is held over the indenter for a specific amount of time called the dwell time. This is the time that would allow the metal to undergo elastic recovery. After the dwell time, the additional load is removed, returning to the preliminary load.
Once the preliminary test force is held for the dwell time, the final depth of indentation is determined (h). Then, the difference between the two depth measurements gives the depth of indentation (H).
As per ASTM E18, the indenters can be either diamond spheroconical or tungsten carbide balls. They are available in diameters of 1.588 mm, 3.175 mm, 6.35 mm, or 12.70 mm.
If a diamond spheroconical indenter is used, then
Rockwell Hardness Number = 100 - (H/0.002)
If a ball indenter is used, then
Rockwell Hardness Number = 130 - (H/0.002)
Where 'H' is in mm.
After the test, the preliminary test force is removed and the indenter is removed from the test specimen.
Types of Rockwell Scale
Table-1 below gives the information on the type of indenter, the magnitude of the major load, and common applications for each of the hardness scales as per ASTM standard E18 (1984).

One of the important guidelines to follow while selecting a Rockwell scale is to choose the scale that specifies the largest load and the largest indenter possible. The specifications should not exceed the defined operating conditions.
The Rockwell scales are available in different types. Each scale uses different combinations of test forces and types of indenters. The Rockwell scale is selected based on the type of metal, size, shape, homogeneity of the material, and the limitation of each Rockwell scale.
FAQs
Rockwell hardness test measures the permanent depth of indentation on the material by applying a fixed load using an indenter. The smaller the indentation value, the harder is the material.
The Rockwell hardness test follows the principle of the differential-depth method. Here, the indenter makes a residual depth called the indent and it is measured. The total test force is applied in two stages to eliminate errors caused due to the roughness of the surface and measurement.
As per ASTM E18, the indenters can either be diamond spheroconical or tungsten carbide balls.
If a diamond spheroconical indenter is used, then
Rockwell Hardness Number = 100 - (h/0.002)
If a ball indenter is used, then
Rockwell Hardness Number = 130 - (h/0.002)
Where 'h' is the indentation depth in mm.
The Rockwell hardness test can be used to determine the hardness of metals like aluminum, thin steel, lead, iron, titanium, copper alloys, and cemented carbides.
Read More


