🕑 Reading time: 1 minute
The hardness of a material is defined as the resistance of that material to an indentation or plastic deformation. Hardness is hence a measure of the resistance of the material towards abrasion, cutting, and scratching.
Hardness test is commonly used to determine the permanent deformation caused in the material due to a concentrated load. The higher the hardness of the material, the higher its ability to retain its shape under an external load application.
By understanding the degree of hardness of the material, it is possible to know the ease with which the material can be machined or its behavior during application.
This article explains five major tests used to determine the hardness of a material.
Contents:
5 Tests to Measure Hardness of Construction Materials
The material can be tested for hardness using different methods, in which each technique expresses its way of defining hardness on its scale.
The five major tests used to measure the hardness of the material are:
- Brinell Hardness Test
- Rockwell Hardness Test
- Vickers Hardness Test
- Knoop Hardness Test
- Mohs Hardness Test
1. Brinell Hardness Test
The Brinell hardness test measures the hardness of the material in terms of the indentation caused by a constantly applied concentrated force. The force is applied using an indenter on the specimen. The indenter used is a spherical can made out of steel or carbide. The test finally measures the diameter of the indentation.
The steel ball indenter is initially placed in contact with the material before the application of constant force. The force applied stays over the material for a duration of 10 to 15 seconds. This time is called the dwell time. Once the dwell time is over, the indenter is removed, leaving a spherical indentation on the material.
The formula determines the Brinell hardness (HB):
HB = Applied force in (kgF) / Surface area of indentation (mm2)
Among all the five hardness testing methods mentioned in this article, the Brinell hardness test makes the indentation with a higher value of width and depth. Hence, this test can be conducted over a material specimen with larger surface areas. Performing the test over a large surface area helps to consider the metal's surface and grain irregularities.
Compared to the other four methods, the Brinell hardness test is slow and leaves a large permanent impression on the test specimen.
2. Rockwell Hardness Test
The Rockwell hardness test measures the hardness of the material in terms of permanent depth of indentation caused due to a concentrated load application. The load is applied using a ball indenter made out of a diamond or steel ball. Initially, a preliminary pressure is applied to the indenter. The indentation depth caused by this preload is recorded and taken as a reference point.

Image Courtesy: Matsuzawa
Once the preload is applied, a major load is added to the indenter for a specific dwell time period. This load further indents the material. The difference between the reference position and the depth of indentation caused due to major load is taken as the permanent depth of indentation.
The test is less destructive and cheaper than the Brinell test. As the hardness is measured in different depths, errors due to surface imperfections can be avoided. No additional equipment is necessary to read the hardness value.
3. Vickers Hardness Test
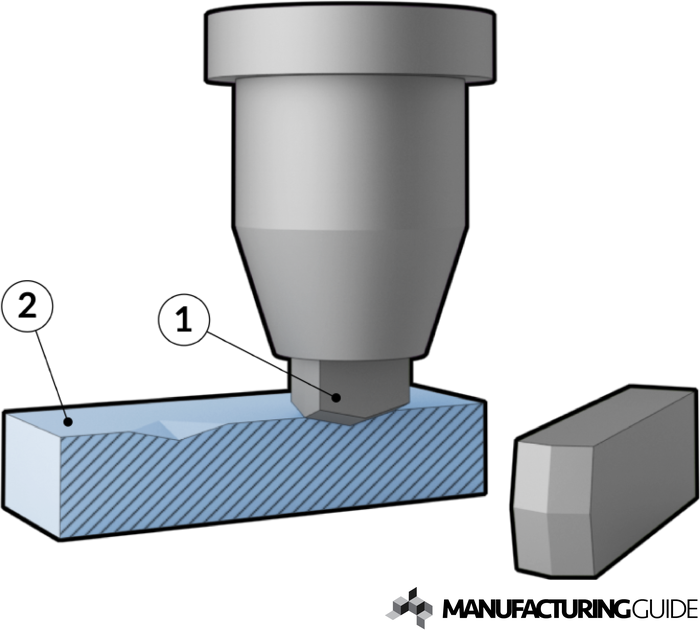
The Vickers hardness test measures the material's hardness in terms of the surface area of the indentation formed on the material by a test load. The indenter used is a four-sided square pyramid.
Initially, the specimen is lifted using the instrument's adjustments until it comes in contact with the sample. The indenter slowly applies the test force on to the specimen until it reaches the specified load value. The force is maintained for a specific dwell time. Finally, the area of the diamond or the square-shaped indentation is calculated.

Image Courtesy: Manufacturing Guide
Then the Vickers hardness ( HV) is given by the formula:
HV = Applied force in kilogram-force (kgF) / Surface area of the indentation
As the Vickers hardness test employs a square pyramid as an indenter, less force with a high accuracy level is obtained for indentation than Brinell and Rockwell test.
The cost of a Vickers hardness test is high as it requires optical and measuring equipment and preparation for the test. The test is also very time-consuming.
4. Knoop Hardness Test
The Knoop hardness test works in a similar way as the Vickers hardness test. It uses a diamond or pyramid-shaped indenter to create an indentation. The indenter is kept for a specific time dwell time. The Knoop indenter is an elongated diamond used to test the hardness of brittle and thin materials without any crack formation.

Image Courtesy- Manufacture Guide
The Knoop indenter has a diagonal that is three times longer than the Vickers diagonal. This length helps in penetration of about half the depth of the Vickers test. It is thus suitable to test brittle materials like ceramics.
The indentation created by a Knoop hardness test is rhombohedral. One of the diagonals of this indentation is seven times larger than the other diagonals.
This formula can be used to calculate Knoop hardness HK:
HK = Applied Test force in kgF / Surface area of the indentation in mm2
5. Mohs Hardness Test
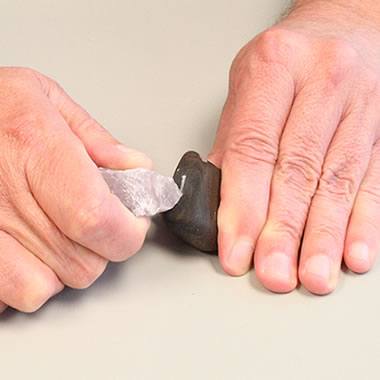
The Mohs hardness test measures the hardness of the material by determining the resistance of the material against scratches. Here, a material of known hardness is scratched on the specimen surface, and the extent of scratches on the specimen is observed.

Image Courtesy: Geology.com
Here, unlike other methods, no indenter is used. The materials are ranked based on a hardness scale called a Mohs scale. The Mohs scale consists of 10 minerals. This test only measures the relative hardness of the minerals and is not used to check the hardness of metals.
There is no universal measurement scale or unit to define the hardness of the material. The understanding of the pros and cons of each test help in determining the best method.
FAQs
The Brinell hardness test measures the hardness of the material in terms of the indentation caused by a constantly applied concentrated force. The force is applied using an indenter on the specimen. The indenter used can is spherical made out of steel or carbide. The test finally measures the diameter of the indentation.
The steel ball indenter is initially placed in contact with the material before the application of constant force. The force applied stays over the material for a time of 10 to 15 seconds. This time is called the dwell time. Once the dwell time is over, the indenter is removed, leaving a spherical indentation on the material.
The formula determines the Brinell hardness (HB):
HB = Applied force in (kgF) / Surface area of indentation (mm2)
The hardness of a material is most commonly determined as the measure of the indentation caused by an indentor subjected to apply a specific load over the material for a fixed period called the dwell time.
The five major tests used to measure the hardness of the material are:
1. Brinell Hardness Test
2. Rockwell Hardness Test
3. Vickers Hardness Test
4. Knoop Hardness Test
5. Mohs Hardness Test
Read More


